How to Cut Steel Safely with an Angle Grinder
Cutting steel with an angle grinder looks straightforward until the sparks fan out, the wheel loads up, and the cut starts wandering off the line. Whether you are trimming rebar, opening a steel tube, or shortening a stubborn bolt, results depend on more than confidence. The right disc, a stable setup, and calm control shape both safety and accuracy. Master those elements, and the grinder becomes a precise workshop ally instead of a noisy risk.
Outline:
• Section 1 explains how the tool works and how to plan a successful cut.
• Section 2 covers protective equipment, fire safety, and workspace setup.
• Section 3 compares wheel types, grinder sizes, and settings for steel.
• Section 4 walks through cutting techniques for common steel shapes and situations.
• Section 5 closes with mistakes to avoid and practical guidance for DIY users and small workshops.
1. Understanding the Tool and Planning the Cut
An angle grinder cuts steel by spinning an abrasive wheel at very high speed, usually around 10,000 to 11,000 RPM on many compact 4.5 inch models. That speed is what makes the tool effective, but it is also what punishes sloppy setup. Before the wheel touches metal, a good cut begins with planning. Steel is not one material in one shape. Thin sheet reacts differently from solid bar, square tubing behaves differently from plate, and a rusted bolt can grab the wheel in ways fresh stock rarely does. The grinder may be the same, yet the approach must change.
The first planning step is to identify the steel form, the thickness, and the finish you need. If the piece will be hidden in a weldment, a slightly rough edge may be acceptable. If the cut line will remain visible, you need tighter control and more cleanup awareness. Mark the cut clearly with a paint marker, soapstone, or scribe line. On dark or scaled steel, high-contrast marks matter. A faint pencil line can disappear under sparks and dust faster than most beginners expect.
Support is equally important. If the steel shifts, bends, or pinches the wheel, accuracy drops and the chance of kickback rises. Clamp the work firmly on a bench, sawhorse, or fabrication table. Position the cut so the waste side can fall away without trapping the disc. This is one of the quiet secrets of smooth cutting: the offcut needs freedom, but the main workpiece needs rigidity.
A useful planning checklist looks like this:
• Mark the line on all visible faces if the steel is thick or hollow.
• Decide where sparks will travel before starting the tool.
• Confirm that the wheel has room to pass through the cut.
• Think about where your hands, cords, and feet will be when the cut finishes.
Experienced users often say the grinder tells you what it wants. That sounds poetic, but it is practical. A machine that is balanced, lined up correctly, and allowed to work at its own pace feels steady in the hands. A rushed setup feels nervous before the trigger is even pulled. Good planning turns the cut from improvisation into process, and process is what keeps steelwork accurate, efficient, and much safer.
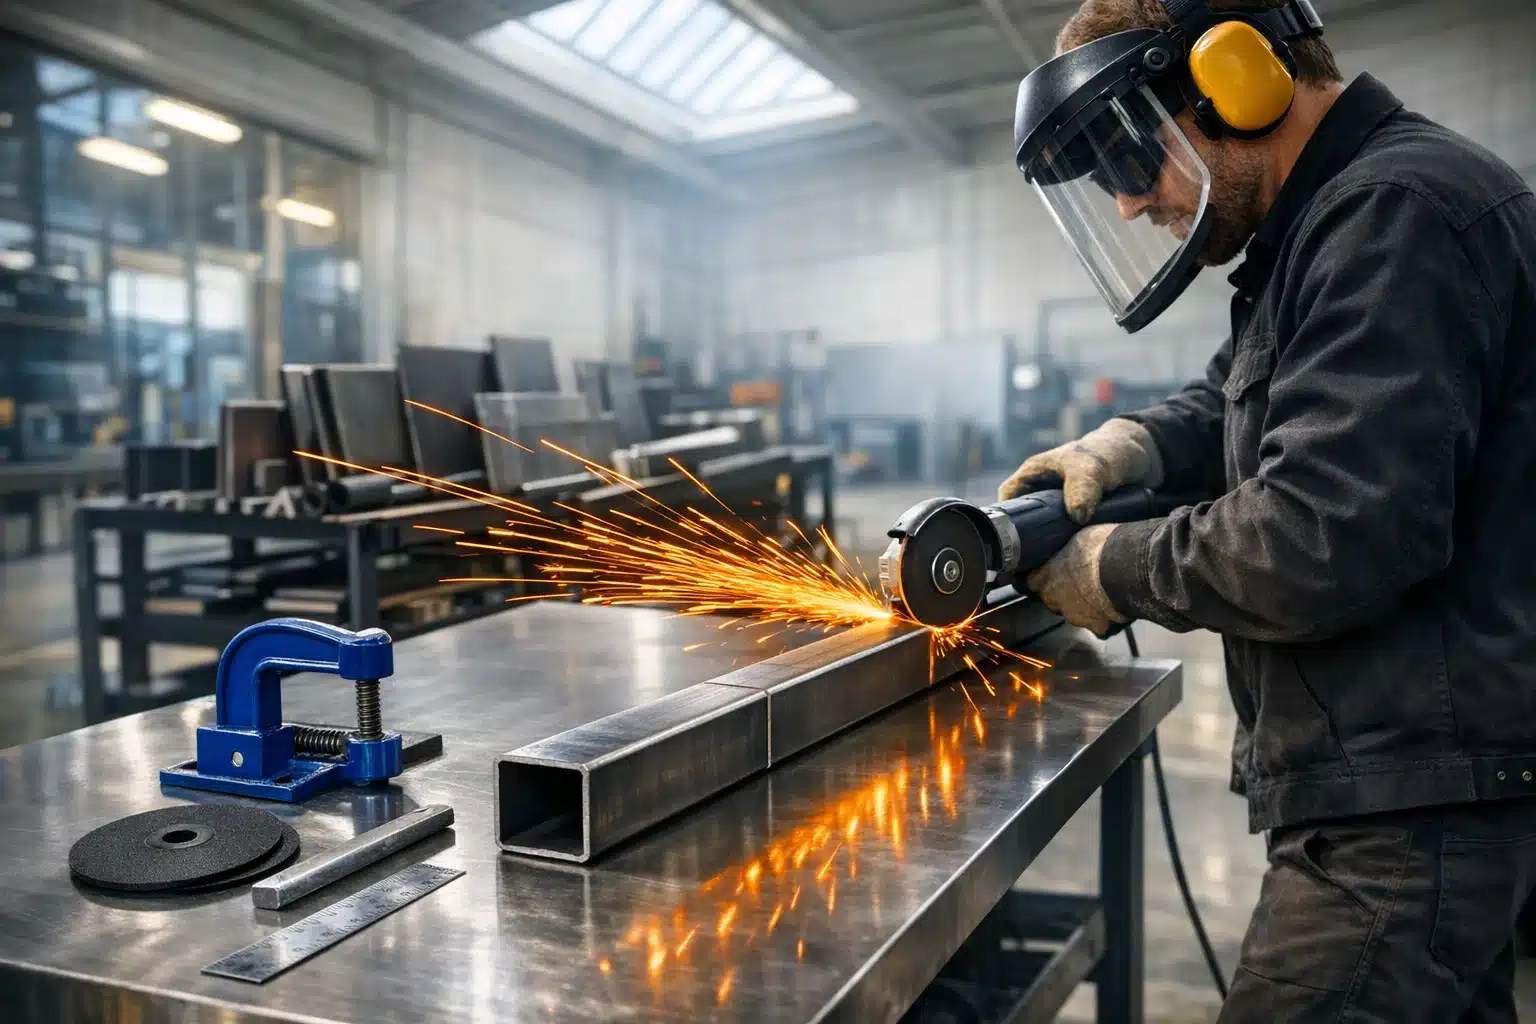
2. Safety Gear, Fire Control, and Workspace Setup
When people picture angle grinder safety, they usually think about eye protection first, and that instinct is correct but incomplete. Steel cutting creates a chain of hazards rather than one single threat. Abrasive fragments, hot sparks, noise, metal dust, wheel failure, and kickback can all happen in seconds. For that reason, safe grinding is less about one magic accessory and more about layered protection.
At minimum, wear safety glasses under a face shield. Glasses protect against dust and small fragments that can come from below or around the shield, while the shield deflects the bigger stream of sparks and debris. Hearing protection matters too. Many grinders produce sound levels well above what is comfortable for extended work, and repeated exposure adds up. Gloves help with heat and sharp edges, though they should fit closely enough that they do not interfere with control. Clothing should be non-melting material such as cotton or wool. Synthetic fabrics can react poorly around hot sparks, which are small but remarkably persistent.
The workspace deserves the same respect as the operator. Sparks can travel several meters, bounce, and find their way into cardboard, sawdust, oily rags, solvents, or dry leaves near an open doorway. In many shops, a hot-work style mindset is used as a benchmark: clear combustibles well away from the cutting area, keep a fire extinguisher nearby, and stay in the area after the cut to make sure nothing starts smoldering. That extra minute of patience is often wiser than the cut itself.
Your setup should include:
• A grinder guard installed and positioned to deflect debris away from you.
• A wheel rated at or above the grinder’s maximum no-load RPM.
• A stable stance with both hands on the tool whenever possible.
• A cord path that stays behind you and outside the spark stream.
• Good lighting, because poor visibility encourages awkward body angles.
Ventilation matters when cutting coated or dirty steel. Old paint, mill scale, oil residue, and rust produce fumes and dust that you do not want concentrated around your breathing zone. If the steel has unknown coatings, pause and identify them before cutting. A strong fan, open air, or appropriate dust extraction makes the job more tolerable and more responsible.
There is also a mental side to safety. Fatigue, impatience, and distraction show up in hand tools immediately. If you are stretching for the last inch of a cut, leaning across the bench, or starting a job in poor light because it will “only take a minute,” you are no longer relying on skill; you are borrowing luck. A safe workspace reduces those temptations and gives you room to do the simple things well.
3. Choosing the Right Wheel and Matching It to the Job
The wheel you mount on the grinder has more influence on the result than many casual users realize. A powerful grinder fitted with the wrong disc can feel clumsy and wasteful, while a modest grinder with a well-chosen cutoff wheel can slice steel cleanly and predictably. For cutting, the usual choice is a dedicated abrasive cutoff wheel rather than a grinding disc. A grinding disc is built for material removal across its face, while a cutoff wheel is designed to enter the steel on its edge. Using the wrong type is not just inefficient; it can also be unsafe.
For many steel jobs, thinner wheels cut faster and leave a narrower kerf. A wheel around 1.0 to 1.6 mm thick often works well for thin wall tubing, sheet metal, and light fabrication because it creates less heat and requires less force. Thicker wheels, often around 2.5 to 3.0 mm, can last longer in rough service and feel more durable on dirty, scaled, or slightly uneven work, but they usually cut slower and remove more material. That tradeoff matters if you need precision. A narrow kerf is easier to control when every millimeter counts.
Wheel size also changes the experience. The common 4.5 inch grinder is popular because it balances accessibility, cost, and control. It is ideal for many home workshop tasks and overhead or awkward-position jobs because it is lighter than a 7 inch machine. A larger grinder offers deeper cutting capacity and often stronger torque, but it asks more from the user in strength, space, and discipline. Bigger is not automatically better. For many DIY steel tasks, it is simply heavier.
Useful comparisons include:
• 4.5 inch grinder: easier to handle, common for bolts, angle iron, tubing, and small plate.
• 6 to 7 inch grinder: more depth and reach, better for thicker stock, but less nimble.
• Thin cutoff wheel: faster, cleaner, less heat, but can be less forgiving if twisted.
• Thick cutoff wheel: sturdier in rough work, but slower and more material-hungry.
Always check the label for metal compatibility and RPM rating. Many discs are marked for ferrous metal, and some are marketed specifically for stainless steel with low contaminant formulations. While mild steel is forgiving, matching the disc to the material helps wheel life and finish quality. It is also wise to inspect each disc before mounting. Chips, cracks, moisture damage, or unknown storage conditions are reasons to skip it. A cutoff wheel is not a part to “use up no matter what.” It is a high-speed consumable, and respect for that fact goes a long way.
If there is one golden rule here, it is simple: never side-load a cutoff wheel. Let it cut in the direction it was designed to cut. A wheel is not a crowbar, not a lever, and not a correction tool for a drifting line. Choose wisely at the start, and the grinder will reward you with a smoother, calmer cut.
4. Cutting Techniques for Plate, Tube, Bar, Rebar, and Fasteners
Once the setup is right and the wheel is matched to the task, technique becomes the difference between a rough opening and a controlled cut. The basic method is consistent: let the grinder reach full speed, bring the wheel gently to the line, establish a shallow starter groove, and then deepen the cut without forcing the tool. Pressure should be firm enough to keep progress steady, but not so heavy that the RPM drops sharply or the sparks change to a labored, scattered burst. When a grinder is working well, it sounds composed rather than strained.
For flat plate or bar stock, a scored first pass improves accuracy. Instead of trying to plunge to full depth immediately, run the wheel along the marked line to create a visible groove. That groove acts like a track for the next passes and reduces the chance of the wheel skating away. On thicker plate, several passes are normal. Trying to rush through all the material in one push creates heat, disc wear, and wandering. Patience is not wasted time here; it is the price of a straight line.
Square tube, round tube, and angle iron need a different rhythm because each face changes the wheel’s contact area. Mark all sides first. Cut one face, then rotate or reposition to cut the next, keeping the disc square to each surface. On hollow sections, many beginners try to drive straight through all faces at once. That often leads to a crooked exit line and a trapped wheel. Working face by face is slower on paper, but faster in practice because cleanup is smaller and control stays high.
Rebar and bolts are often quick jobs, yet they deserve care. Clamp the piece securely and expect the final separation to happen suddenly. On solid round steel, it can help to cut partway through, rotate the piece if possible, and finish from another side. This reduces binding and can produce a cleaner break. For rusted bolts in confined areas, protect nearby surfaces from sparks with a metal shield or suitable barrier rather than trusting your aim alone.
Technique reminders worth keeping in mind:
• Keep the wheel nearly perpendicular to the cut when using a cutoff disc.
• Do not twist the tool to widen the kerf.
• Let the offcut fall away from the wheel, not into it.
• Pause if the steel turns blue far beyond the cut zone, because excess heat may be building.
• Expect hot edges and burrs after every cut.
Thin sheet steel is its own challenge. It vibrates, warps, and heats quickly. A light touch is essential, and additional support under the sheet can reduce chatter. In some cases, a nibbler, shear, or plasma cutter may outperform the grinder, but if the grinder is what you have, use a thin wheel and steady support. Think of the cut as guiding a violin bow rather than chopping wood. That image may sound artistic, yet it fits: the best angle grinder cuts are controlled by feel as much as force.
5. Summary for DIY Users and Small Workshops: Avoiding Mistakes and Building Better Habits
Most poor cuts with an angle grinder come from a handful of repeat mistakes: the wrong wheel, weak clamping, bad body position, excessive force, or a workspace that was never truly prepared. The encouraging part is that these problems are fixable. You do not need a huge fabrication shop to cut steel well. You need a sound method, a disciplined setup, and enough patience to let the tool do its job instead of trying to overpower the material.
One common mistake is chasing speed. People see sparks and assume more pressure equals more productivity. In reality, forcing the wheel often causes faster wear, more heat, and a rougher line. Another mistake is ignoring the last inch of the cut. That final moment is when the offcut can drop, pinch the disc, or snap away unexpectedly. If you plan the support before starting, the finish of the cut becomes much calmer. Small decisions at the beginning protect the result at the end.
Another habit worth building is post-cut inspection. After the grinder stops, look at the edge. Is there a heavy burr? Did the line drift? Did the wheel glaze or wear unevenly? Those clues tell you what to adjust next time. A rough edge may suggest too much force. A wandering line may point to poor marking or an unstable stance. An overheated surface may mean the wheel was too thick, too dull, or pushed too hard. Steel is honest in that way; it shows the evidence of the process.
For practical day-to-day use, remember this short list:
• Choose a cutoff wheel made for steel and rated for the grinder.
• Clamp first, cut second.
• Wear glasses, a face shield, hearing protection, and suitable clothing.
• Keep sparks away from anything flammable.
• Make a guiding groove before going deep.
• Never use a cutoff wheel for side grinding.
If you are a homeowner, a farm user, a mechanic, or someone building projects in a small garage, this topic matters because the angle grinder is often the first metal-cutting tool within reach. It is affordable, versatile, and capable of excellent results when used with respect. You do not need to cut like a production fabricator to work safely and accurately. Focus on preparation, choose consumables carefully, and treat each cut as a controlled operation rather than a quick attack on the steel. Do that consistently, and the sparks stop looking chaotic. They start looking like a sign that the job is moving exactly as planned.